Friday, 26 February 2016

Art History- Double Exposure Research


In the urban sense- Miki Takahashi- 2012

        It was taken by Miki Takahashi in 2012 and is a self portrait. There is no title but the title of the whole series is called 'In the urban sence”.It is meant to represent her feelings on the ‘in the urban sence’ and portraying herself and the outside world. In the pictures she is on the foreground of the image, and inside her head are the urban landscape of where she lives. It communicates feeling and is very aesthetically pleasing.  There is an ethereal feel to the pictures, this is due to how the pictures are layered which make it feel dream like. The colours in the pictures are very bright with the rest of the picture very pale, where the bright colours are 2 of the 3 primary colours.
In her portfolio it states that it is digital photography, If this is the case she has taken 2 pictures and blended them together in photoshop by using masks. The Pre-production way to achieve this would be to expose your film twice in the same frame, which is very unpredictable as planning the framing would be difficult. I suspect It was digital due to it being in the modern day with access to photshop and digital cameras are so easy to come by as film is still not as common especialy when you are an Internet artist who would want to put the pictures online easily. I want to use the film method as It would involve no post-production.
        The pictures are taken at 2 different times of day, the portrait in the day and the city at night. This creates a big contrast between the colours and the pictures. I like that there is a split. It shows us that she relates to the city and all the emotions that are inside it. When taking a double exposure with film you have to think about the lighting on each, and make sure they do not clash. This is more pre production where Takahashi uses post production.
The pitures make me think that there is more behind the pictures than meets the eye. It looks very emotion and where she has a connection to the city, It is possibly where she lives and grew up so she has a connection to the place.
     I'm using the influence of her style and use of portraits and landscapes/cityscape behind the portrait, but I will use a film camera.

In the urban sense- Miki Takahashi- 2012
This is another of her pictures form the same set of work. It is very similar in the sense of herself on one layer and a city behind her as they fade into each other, creating another dream like sense. I think that it shows herself, as it is japan behind her and that is where she is from.
The image has the girl on the left and the city on the right and there is a 3rd split with the girl in one of the 3rds.
The city again has been taken at night and the person during the day giving a very dream like contrast. The colours are very dark which relates to the urban theme that is in her pictures.

Hodachrome-Persona-2015
Hodachrome- summer portraits  - 2015

Hodachrome, is a lomogroahy user who has posted some of his work, and wrote some how to guides to producing double exposures. This picture has no title but is in a collection of all of his double exposures. It is a boy and fire works. Both taken on film, Presumably at  the same time, or taken in different sets, as I  have seen a way people on lomogroahy use a hole punch to reference the start of the film. This was taken In Tokyo, as is all of his  pictures, he explains that he loves the 4 seasons of Tokyo, and his sets of double exposures represent this work with all the seasons in mind.  This picture is the one that caught my eye as the person isn't as detailed as Takahashi. Which adds another depth of mystery to who this person is. Which is the same for his other work persona where all the people and other background settings are silhouettes. 
The pictures colour is blue whit the explosive red of the fireworks. This realty separates the pictures from each other as they are layered, it makes it more obvious. I think that the colours of the film are also different from what you can see with your eye which suggests that he has used film, as its an effect that only happens with film. where the persona image is very similar with a silhouette but has buildings and trees as well, with red flowers in front of it.
The colours of the fireworks contras with the blue sky and with the fireworks could have been multiple exposures. 
I think that the work is very dream like much like Takahashi, which I think is the desired effect when doing double exposures.
It was taken with film although it looks very similar to Takahashi, who used digital. I would say that is down to the skill and the familiarity with using double exposures of the artist. Hodachrome uses film as he has a love of film like me, which is why lomogoraphy is a platform for him to use and would not have been able to do this without lomogrpahy around releasing the old cameras pushing the 'dont think just shoot" idea, much like the "decisive moment" from Henri Cartier-Bresson.
Where as Takahashi has a different way of showing her work as she sells her art so it has to appeal to a wider audience compared to Hodachrome as he is doing it for fun.


Wednesday, 24 February 2016

Shoot 1-Film Destruction Lemon

In this shoot I used a colour 35mm film in the Nikon EM. Its a camera that shoots in Aperture Priority mode. Before I shot I soaked the canister in a lemon juice and vinegar solution for an hour. This made the films colour layers decay. It produced a very red tint to the pictures, where a lot of the sky came out very off colour. In a few you got a green smudge or dot. This was not as extreme as I had thought it would have been or how the pictures that Mathew Cetta or the lomography community had achieved. I would love to try it again and use different chemicals and look into using different methods such as boiling it.
I shot a verity of landscapes, close ups and portraits, to experiment with the different subjects and what effect the lemon would have on the picture. I found that the pictures were effected at random,and didn't have a reason for creating the green smudges or red tint. Some frames on the film also has smudges and tints on where there was no exposure taken, this was due to the film sticking when it was being used. Again I found myself not taking pictures with a theme, as I don't always use up film in one place and will go on until I finish a roll so I don't waste film.
The picture that demonstrates the effects the most is the one of the blue bins, It has a very big green smudge and the red tint is very evident around it. You can also get scratches and black lines on the image with is where it was scratched while I dried the film after the lemon soak.
Next shoot I am looking into double exposures, but will come back to this at a later date as the prep for the shoot took up to 2 weeks, with drying the film. I would like to look into boiling the film or using cola, which also gives some strange effects. I think that I did not get as dramatic effect as I was hoping for was due to the type of lemon juice I used. As I used some from a bottle rather than an actual lemon.


Tuesday, 23 February 2016

Art History -Film Destruction

Boiled- Mathew Cetta 2013
Mathew Cetta Is a photographer, he did a fine arts in photography degree in New York and originally wanted to be a retoucher . The set of work we are looking at is called photogenic alchemy, which was a process of destroying the film before you use it to take pictures, the effects of it is hard to repeat and work in different ways depending on the chemicals that you left the film in. 
Lemon Juice- Mathew Cetta 2013
He went through a stage in his life where he didn't like the perfection of retouching and hence set on doing something unpredictable. He also set up a kick starter that would bring his manipulated film to the public but it never took off as it is quite simple do yourself, and no one will process your film for you as it would contaminate the chemicals and destroy the other films which isn't good for business

This pictures was made with lemon juice soaked and the other was boiled film, It is taken of Brooklyn bridge in New York. It was taken with a 35mm colour film and destroyed and developed in a normal way. It looks like it is an effect that has been added after it was shot as its looks like an overlay, but it was done before the picture was taken. the chemicals degrade the layers of colours on the film which absorb different light frequencies. and depends how far it degrades and how the chemicals react will produce the change in colour and lack of picture quality. I like how the colours have given the pictures a post-apocalyptic feel, as it all looks gimy, they different colours also add to the pictures mood. as the red and green mix hides the pictures behind but the lemon juice makes it look very dream like. 


link boiled film-Dopa-2014
In the Lomography community there are a few examples of this techniques showing all the unpredictable outcomes. There are a few recipes and ideas to try. The common one is a soup, where you will boil the film and maybe add some other chemicals.
This boiled one from the community was taken by user Dopa. He is German and boiled his film for 10 min and then dried it in a dark room. It must have degraded a few layers on the film to bring the blue out.
All this wouldn't be possible without the driving force of lomogroahpy and the inspiration it gives for people to try and experiment with different chemicals and idea. As its very obscure in what you can do. also very unpredictable, so all the artist would have had to be persistent to try new things.
I find that the blue is very calm colour, and the shoot that this is from gives that feeling due to the colours.


Boiled with detergent - Hodachrome 2013
User Hodachrome did a similar thing, But in the dark room applied detergent to the film which created the dots that are scattered across the image. I think that this could make the destruction even better although it would be hard to proses at a store as they might reject it.

 Lomography users call this process souping, where you boil the film and add other chemicals sometimes.Lomogrpyh was formed in 1992 but wasn't until the early 2000s when loomogrpahy started up pushing the "dont think just shoot" lomography being a leading figure in the experimental side of the film world and camera production, as they sell and make different cameras that allow you to do very different things from the standard camera. Such as the super sampler that has 4 lenses and the 360 degree camera that can take a picture of 360 degrees. If it wasn't for lomogrpahy in the early 2000s I doubt a lot of the experimentation with film would be low key and wouldn't be as easy to do.

For my first shoot I want to look into lemon juice or boiling, as they look very different. I would also like to see the difference with shooting before or after you dip it in chemicals.

Thursday, 4 February 2016

Truth, Fantasy or Fiction

The best part about the starting point is that you didnt have to use all 3 words as you could have chosen just one, which gave tou a wide range of ideas to choose from.

This is my overall view of truth fanctacy and fiction, I looked into many things such as surealisum and how I could make very thing look sureal, I looked into books and storys, where I could have told a story though my art as I went a long,  Looked into camera techniques to where I would change how I took a picture to make it look fantasy like.
I was very interested in macro and getting close up tho things, as its something I had never done before much like portraits which I could have mixed with surealisum. I found that I should stick to my strengths and use film and photoshop and the the techniques around that to change the image (the truth)
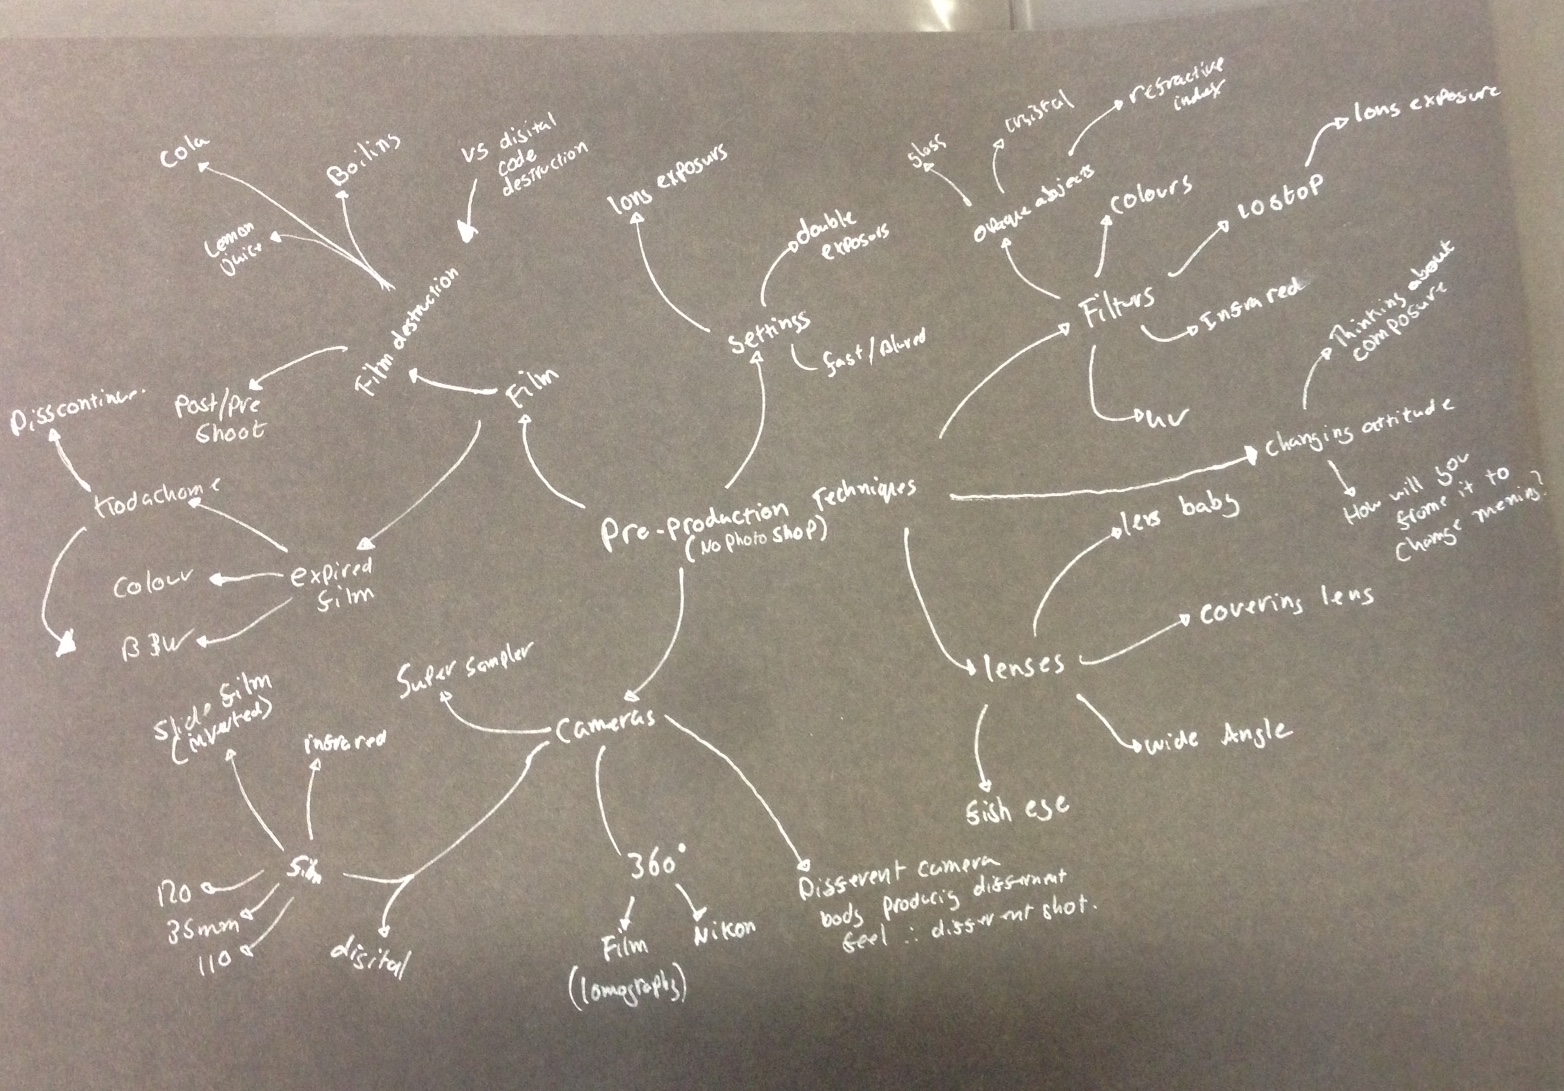
Initial ideas involve film and digital, sticking with my strengths of effects, colour and photoshop.  My initial ideas were post or pre production to effect the truth. I wanted to do both but figured that it was a very broad and have chosen to focus on pre production techniques, "destroying the truth through pre production techniques".

Starting with ideas such as double exposure, filters, prisms, long exposure, film destruction , partially covering the lens. Looking at a few artists who use each technique. I have also looked into using expired film and combining all of the above to create some hybrid of techniques.

Friday, 29 January 2016

Evaluation

My intention was to compare digital and film photography. I think I have achieved this in the ways I have had directly compared the digital and film, through the different cameras and film types to the standardised digital sensors. I feel that I have effectively explored lots of differences and similarities of film and digital. With all comparisons I got to experiment with different cameras and different film, and got an experience of using the dark room, which is something that is very different from using a digital camera, working with your hands to produce and image. My main influence was Vivian Maier who took lots of pictures in film. My over influence where I used there process and thoughts behind there work, rather than there work itself, which guided me in different directions, which is where I come across the final piece. Due to the medium, film photography can be hit and miss. I had a good run with most the cameras, but one shoot didn't go to plan as it was out of focus, and in the beginning the pictures were very over exposed / under exposed as I want very good at guessing settings, and I eventually used light meters on my phone, which produced better results. I chose my final piece as it was a large range of all my comparisons, which I thought really demonstrated my experimenting with different techniques and use of analog and digital methods of editing. I have 8 pictures with 4 on each side, and the digital is opposite the film equivalent of the picture. I will mount It on foam board, with a black backing.

Tuesday, 26 January 2016

Final Piece

This is what I hope my final piece to look like. The first set is a long exposure using wire wool, shot on 120 colour film vs a DSLR The second set is shot with a 50mm lens, and is of a tyre suspended, using 35mm film vs  a DSLR. The third set where I used a colour 120 film vs a DSLR. The last set is another 50mm lens with a 35mm vs a DSLR, with an edit in photo shop and using photographic dyes.

Monday, 25 January 2016

Final Shoot - Comparison 120


In this shoot I used the old 120 fold out camera, which I used in the first 120 shoot I did. Still looking at Vivian Maiers work with using 120 film and Richard Long, who took walks to make his art, I still wanted a final shoot go to get pictures for my final piece. I Decided to reshoot shoot 2. This would give an another comparison shoot to work with for my final piece.

In the end this shoot didn't go as planned. A lot of the pictures are out of focus. In the contact sheet it doesn't look that bad, but when trying to print my work it all comes out as blurry images or the part that I thought would be in focus wasn't but another is. This is due to the camera I decided to use only had a view finder and no way to visually see the focus, which I accepted that would be a struggle, but I thought I would be far better at using the camera than this. I think that the landscape picture will be in focus as it was set to infinite which is what is needed when shooting landscapes. All the others are slightly out which doesn't make for a good photo.
I learned a lot from this shoot, as so far all my shots have worked and came out fine, this has been the first shoot that I have had problems with, and has shown me the reliability of film isn't always as reliable as I have experienced so far. I have learned that using some cameras take skill and practice, such as one with manual focus where you have to guess the range.
The best edit for the shoot is the hand rail, as it has a very soft looking focus, much like when using a lens baby. It is focused about a meter in front, and no where else. It has a very white sky, and the blacks are black, which shows it was a good print, but even the dark room cant fix focus like it is as forgiving with exposure.


I also had another film camera with me at the time, although only had 6 pictures left on the roll of film, so I did shoot some pictures with the Nikon EM which was the one I used in the second shoot. These pictures came out better, with pictures that have a high contrast between the back and white. They are pictures that I could use in the final piece.

Next I will be gathering all the good comparison pictures to create my final piece, so I have 8 pictures, 4 digital and 4 film and I will print the film myself.


 this has been taken through a fence  It was very strange how on the film I managed to get a large depth of field where as on the digital It only caught the background and made the fence out of focus, even though on both cameras I used a 50mm lens.
This is the best edit of the 120 section of the film. I like the soft focus, which makes it looks very subtle. The focus on both are about the same, but at slightly different angles.

This was taken with a 50mm lens, from underneath the tree. I was trying to capture the rope and cloth hanging from the tree as it looked very interesting. although to the focal length of the digital camera it cropped the picture. which produced an interesting view on the different cameras.


Friday, 22 January 2016

Scanning 120 film alternative

After recent shoot not going to planned, and a few 120 shots were out in focus, but I am struggling to use the enlarger to get it in focus while printing. So I wanted to invest some time with looking at scanning film, in particular 120 as we have an attachment for 35mm film but not 120.

On flicker I found a group discussing this, and one man posted how he does it, 


"1 Since I process my B&W film myself, I usually have a 12 exposure strip. I center two negatives at a time on the top of the scanner plate. 


2. Cover them with a sheet of Velum paper (actually regular white printer paper would work too). 

3.I then place a piece of clear glass over this to keep the negatives flat during the scanning process.

4. Next comes my light source, I use a 100watt equivalent florescent lamp in a metal reflector. This is place directly over the glass and negatives on the flat bed scanner.

5. Finally I use the scanning control software that came with the scanner to scan in my images.
"


here is my results:


It worked okay, It was a very good way to really determine how In focus my pictures were, as the contact sheet didn't. The colour correction wasn't too difficult and I changed a few of the levels in photoshop.

source

Thursday, 21 January 2016

Shoot 7-Colour Comparison


Film

Digital

After looking into lots off different artists, I decided to look back at Vivian Maier, and in this shoot I wanted to do a comparison with 120 colour film and digital still using the Richard Long idea of taking pictures on a walk, as it seams the easiest way to get a common theme in my work while focusing on the broad subject of film vs digital. I took this shoot around the harbour. I went with my sister and brother, with the intention of taking pictures of people in this shoot as well as views and objects. I have lined up both contact sheets so the corresponding digital is with the film. In this shoot I shot with a colour 120 film, and due to my limitations of printing and developing colour I had to get them sent off.
The colours on the film look far less real than the digital images, but I prefer the film. The colours make the blues look a lot lighter and cooler than the digital did. No doubt you could get the same effect with photoshop. In some ways the colour shoot looks a lot more like real life than the black and white does.
The other major differences with this shoot is that the angles I shoot from a free different from the digital SLR, due to where the view finder is on the TLR is from the top so you would have had to look down, which suited Maier perfectly when she took candid pictures in the streets as it wasn't obvious she was taking a picture.
Jason was experimenting with fire wool and long exposures and I took it as a way to help him and get a few shots with my film camera to see if it was as easy as it was using digital. Which it was, and came out just as cool as the digital. The only difference is the colour and  you can see the person spinning the wire wool in the middle more clearly which gives it a different look to the digital. It is slightly out shaky due to the longest exposure was 2 seconds so had to hold it on bulb.
I think this shoot went very well. It worked as it looks so different from the black and white shoots I have been doing.


On the left is the film and right is digital.


Accidental double exposures

This was taken when I was doing my colour film comparison, I forgot to move the film on between comparisons and had to walk back to get some shots, that I later discovered they were not exactly like the digital due to this, as I forgot to take a reference.

Jason and a ceiling, camera had no stop to double exposures. But it came out pretty well.

Not accidental, Came out very well, It was more a test to see how to do a double exposure using the Nikon EM, which has a double exposure lock.

Sunday, 17 January 2016

Vivian Maier - revisited

I have decided to look back at Vivian Maier, This time I wanted to focus on her colour rolls of film. As I wanted to experiment with using both colour 120 film with the TLR camera and also do a digital comparison. So I will deconstruct some more images which are apart of her selection of colour film. 
To see how different she used it to the back and white.


1956
This picture was taken in 1956, using kodak colour film or something similar. It has been cropped to a square, which would indicate it was cropped during printing / scanning for artistic reasons or it was taken on medium format. Which is a higher quality of film than 35mm , but it for small images there is very little image quality difference. It is a candid picture of a woman with her hands behind her back. It was probably taken on her Roliflex TLR, which was her most used 120 film camera. Using the TLR it would have been easy to get secretive shots such as this. It was all the time when colour just being used but still for special events/ holidays as it was far more expensive than black and white so Maier would have been experimenting with colour.The contrast with the red dress and the blue water in the back ground that is out of focus draws you into the dress. She would have done this deliberately to see what colour film could do and what affect she would get with it.  It would have been taken in Chicago as at the time she was working for a family there. A lot of Maiers images makes you question her thoughts behind the pictures she takes. Leaving you curious about what she was like.

1976
This was taken on a 35mm range finder or SLR, Most likely her Leica IIIc. You can tell this by the cropping of the picture as it is a rectangle and you can see from the shadows that she is holding the camera up to her eye. The picture has been taken in colour film and is of a lake with a discontinuous lens held up to the horizon which splits up everything within this lens. It was taken in 1976 which was after her Chicago job, so this could be placed anywhere as in the 70s she went traveling all over the world. This was also when colour film was coming down in price , previously It was used but it cost 3 times the amount of black and white which is why Maier would have started to use it more commonly as it was cheaper and developing was far easier to come across as black and white developing had become less widely advertised. I like how you can see her hand holding the lens up and the light refracts though it. It is a landscape picture but it has some added attract elements because of the lens


For the colour she was still able to use all the cameras she used before, and she also at this point bought some more cameras such as the Leica IIIc which is a rangefinder which is more like a point a and shoot with an indicator to the you the focus. Instead of the TLR which I have discovered to be far harder to use than I initially thought.

Friday, 15 January 2016

Shoot 6 - Loomogrpahy camera


Taking inspiration from the company Lomography, who are attempting to get analogue photography back in main stream, they have been bringing back a lot of Russian type analog cameras which are easy and cheap to use, in an attempt to get film back into regular use. They have a camera that is called the super sampler. Which has 4 lenses and you have 2 options to take all 4 lenses at once or expose them all in 2 seconds which produced different effects. There is no other settings to change on the camera so I a few of my pictures are very dark and are unusable. I used one of their cameras before, the 360 degree camera. I wanted to experiment with unconventional cameras.
I found that the camera was easy to use and in the end I stopped taking time with taking pictures like I normally do with film. As there was no view finder I couldn't know what exactly I was taking pictures of and as there was no light meter or manual settings so a lot of the pictures came out under or over exposed. It was a camera made my lomography and was advised to use a 800 ISO film on a cloudy day. I used a 200 ISO and a 400 ISO. It was sunny for most of the time and I took a few shoots in the car and thought the lights would pick up, but they didn't and came out as black.
The whole shoot went well. I used the camera over a week and found that it a very different experience as it was a small camera that fit in my pocket that I could take spontaneous as there was no messing around with settings and focus, as it focused form 0.3m to infinite.
This is my first shoot with this camera and I would like to go on and look at other lomography articles and see what other interesting shoots I can do. I am also going to do another direct comparison shoot.


This was taken with the short timer and was a selfie with Jason and me. Due to the 4 lenses each strip is at a slightly different focal length.

This is someones hands moving over 2 seconds, it showed movement. It was badly exposed as there wasn't enough light inside. It works a lot better when you are outside.   


Took at arms length, short time and it shows the different angles each lens has.

Over 2 seconds, got Jason to jump and you see that when I printed it I only printed 3 frames out of the 4. 


Lomogoraphy Insparation


Lomography is a company trademark that is in an attempt to bring back film photography. It uses lots of camera designs from Russia. It uses the designs and remakes them to sell. The also stock lots of different kinds of film ranging from different tints to standardised film, with the added extra of 16mm movie camera film and 110 film. They have developed their own range of cameras which include the 360 degree camera and the super sampler, which all have very unique and imaginative uses. I have used both of these cameras and due to me using back and white I got very different effects than the examples on lomographys website.
They also run a blog where I found that they show off their products and look into different techniques which I want to try a few of them. Such as:
  • Double exposures
  • Film destruction
  • 35mm colour slides
  • 360 degree cameras
  • super sampler cameras
  • expired film
  • cross processing
  • ect.

The platform in which lomography works is in the end a company who is making money, but there products have inspired many different people in there community to stretch out and test the limits of film and all the difference it can be, compared to a digital camera I can think of so many more ways a film camera can do that the digital couldn't recreate at all in post production, let alone in camera.I find that lomogrpahy users all have found what they like to do, some are still experimenting and tying things others have already done, but always add there own twist and skill to it.
This is a screen shot from the first page on there website of uploads from there users all the images are taken my some different and are all using different techniques and all take pictures in different ways. You have double exposures, fish eyes, cross processing, black and white photography, with all this depth and all the different ideas I'm sure lomogrpahy will be a big influence as I continue to use film
They have a selection of cameras and lots of starter kits to introduce people to film, such as the Diana which is a box camera and uses both 120 and 35mm film and was based of an old camera Produced in the 1960 in Hong Kong but very quickly became less popular due to other alternatives. I find that they have made analog photography more into the main stream than it has been in the past few years. 


Tuesday, 12 January 2016

Photo Dyes - Experimenting

While in our dark room I found a box of photo dyes. I decided to experiment with the colours and found that it works well on the white of the picture. So I chose some over exposed pictures and a few normally exposed ones to look at the different effects I could get with the dyes. My idea was to bring colour to a black and white print. I wanted to try to get realistic colours but in the end went for more surreal and obscure colours.
Taken with the Lomography Super Sampler, I had 4 identical slides on one page, so I thought I should change the back ground colour. So i chose 4 different colours and painted around Jason and Myself. I found it hard to do as I'm not the best with a paint brush. But I managed to get a wash of colours. I like that each colour gives it a different feel to the picture. Much like my colours linking to emotion I did in unit 2.

In the beginning I attempted to just paint the jacket and that looked good but I wanted to add a skin colour, but It was hard to get that colour using the selection of dyes I had. I also found it hard to stay in the lines as I used a big brush. I feel it makes him look like a tomato, but the blue has been diluted a bit which made it lighter than the original blue.

This was fun to do, I painted each penguin a different colour, and I like how I only dyed a small section of the picture. It looks very abstract as you would never find different colour penguins (unless they were sunburned) I liked that with this one I got slightly better at using the dyes and I was able to stay in the lines and I found a smaller brush to do so.

I liked using the dyes, I didn't use the dyes to how they are traditionally use, which was to add realistic colour to the picture, which is slightly beyond my art skills. I found that once you put the dye to the page you couldn't remove it, and so you had to be very careful. 


Wednesday, 6 January 2016

A different View of Vivian Maier

https://www.youtube.com/watch?v=66oDaqgdTyI

Ted Forbes is a photographer who shares his passion through youtube. He did a video talking about Vivian Maier. He gave a very different perspective to her work. He likes her work, he thought It was questionable on how her work is being sold.

He said things along the lines of, that because she wasn't alive to produce her own work or tell the person who prints what she wants, Its very much John Maloof's interpretation of her work and how she wanted it printed. How a lot of the pictures that have been sold, are not the best and he thinks that Maier would have had something to say about what could and couldn't be sold. He also goes onto say that the documentary, the people who knew her, said that she would be horrified by what was going on with how things were being sold, as she was a very private person.

Further more with the tags that people add to her such as  " turning point in street photography" where Maloof was the person who is pushing for this angle on Maier, which many believe was not what she would have wanted.