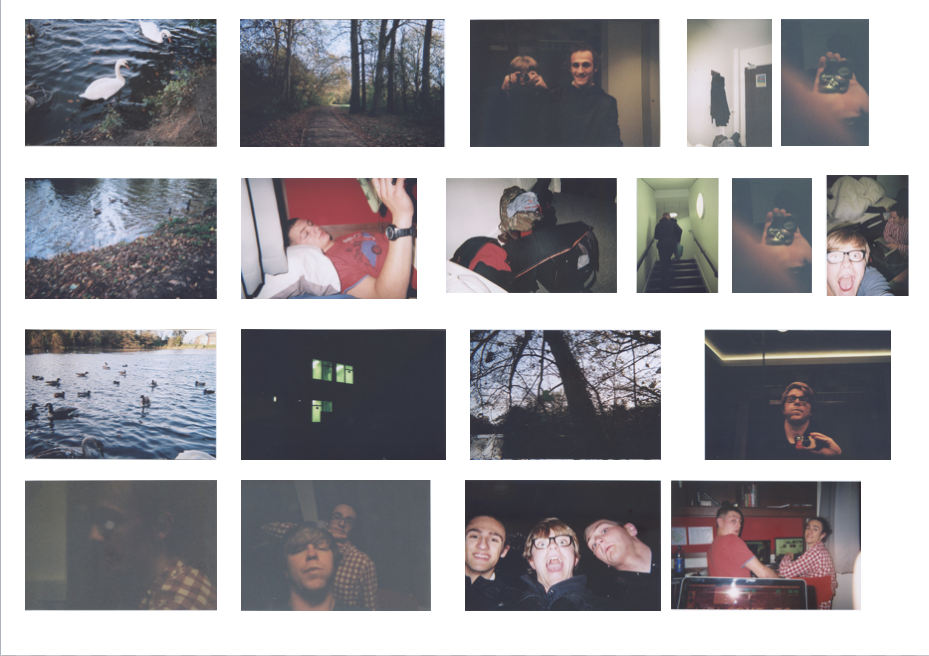
My intention was to compare digital and film photography. I think I have achieved this in the ways I have had directly compared the digital and film, through the different cameras and film types to the standardised digital sensors. I feel that I have effectively explored lots of differences and similarities of film and digital. With all comparisons I got to experiment with different cameras and different film, and got an experience of using the dark room, which is something that is very different from using a digital camera, working with your hands to produce and image. My main influence was Vivian Maier who took lots of pictures in film. My over influence where I used there process and thoughts behind there work, rather than there work itself, which guided me in different directions, which is where I come across the final piece. Due to the medium, film photography can be hit and miss. I had a good run with most the cameras, but one shoot didn't go to plan as it was out of focus, and in the beginning the pictures were very over exposed / under exposed as I want very good at guessing settings, and I eventually used light meters on my phone, which produced better results. I chose my final piece as it was a large range of all my comparisons, which I thought really demonstrated my experimenting with different techniques and use of analog and digital methods of editing. I have 8 pictures with 4 on each side, and the digital is opposite the film equivalent of the picture. I will mount It on foam board, with a black backing.
Showing posts with label Unit 3- Film Vs Digital. Show all posts
Showing posts with label Unit 3- Film Vs Digital. Show all posts
Friday, 29 January 2016
Tuesday, 26 January 2016
Final Piece

Monday, 25 January 2016
Final Shoot - Comparison 120


In this shoot I used the old 120 fold out camera, which I used in the first 120 shoot I did. Still looking at Vivian Maiers work with using 120 film and Richard Long, who took walks to make his art, I still wanted a final shoot go to get pictures for my final piece. I Decided to reshoot shoot 2. This would give an another comparison shoot to work with for my final piece.
In the end this shoot didn't go as planned. A lot of the pictures are out of focus. In the contact sheet it doesn't look that bad, but when trying to print my work it all comes out as blurry images or the part that I thought would be in focus wasn't but another is. This is due to the camera I decided to use only had a view finder and no way to visually see the focus, which I accepted that would be a struggle, but I thought I would be far better at using the camera than this. I think that the landscape picture will be in focus as it was set to infinite which is what is needed when shooting landscapes. All the others are slightly out which doesn't make for a good photo.
I learned a lot from this shoot, as so far all my shots have worked and came out fine, this has been the first shoot that I have had problems with, and has shown me the reliability of film isn't always as reliable as I have experienced so far. I have learned that using some cameras take skill and practice, such as one with manual focus where you have to guess the range.
The best edit for the shoot is the hand rail, as it has a very soft looking focus, much like when using a lens baby. It is focused about a meter in front, and no where else. It has a very white sky, and the blacks are black, which shows it was a good print, but even the dark room cant fix focus like it is as forgiving with exposure.


I also had another film camera with me at the time, although only had 6 pictures left on the roll of film, so I did shoot some pictures with the Nikon EM which was the one I used in the second shoot. These pictures came out better, with pictures that have a high contrast between the back and white. They are pictures that I could use in the final piece.
Next I will be gathering all the good comparison pictures to create my final piece, so I have 8 pictures, 4 digital and 4 film and I will print the film myself.

this has been taken through a fence It was very strange how on the film I managed to get a large depth of field where as on the digital It only caught the background and made the fence out of focus, even though on both cameras I used a 50mm lens.

This is the best edit of the 120 section of the film. I like the soft focus, which makes it looks very subtle. The focus on both are about the same, but at slightly different angles.

This was taken with a 50mm lens, from underneath the tree. I was trying to capture the rope and cloth hanging from the tree as it looked very interesting. although to the focal length of the digital camera it cropped the picture. which produced an interesting view on the different cameras.
Friday, 22 January 2016
Scanning 120 film alternative
After recent shoot not going to planned, and a few 120 shots were out in focus, but I am struggling to use the enlarger to get it in focus while printing. So I wanted to invest some time with looking at scanning film, in particular 120 as we have an attachment for 35mm film but not 120.
On flicker I found a group discussing this, and one man posted how he does it,
"1 Since I process my B&W film myself, I usually have a 12 exposure strip. I center two negatives at a time on the top of the scanner plate.
2. Cover them with a sheet of Velum paper (actually regular white printer paper would work too).
3.I then place a piece of clear glass over this to keep the negatives flat during the scanning process.
4. Next comes my light source, I use a 100watt equivalent florescent lamp in a metal reflector. This is place directly over the glass and negatives on the flat bed scanner.
5. Finally I use the scanning control software that came with the scanner to scan in my images. "
here is my results:


It worked okay, It was a very good way to really determine how In focus my pictures were, as the contact sheet didn't. The colour correction wasn't too difficult and I changed a few of the levels in photoshop.
source
source
Thursday, 21 January 2016
Shoot 7-Colour Comparison
 |
| Film |
 |
| Digital |
After looking into lots off different artists, I decided to look back at Vivian Maier, and in this shoot I wanted to do a comparison with 120 colour film and digital still using the Richard Long idea of taking pictures on a walk, as it seams the easiest way to get a common theme in my work while focusing on the broad subject of film vs digital. I took this shoot around the harbour. I went with my sister and brother, with the intention of taking pictures of people in this shoot as well as views and objects. I have lined up both contact sheets so the corresponding digital is with the film. In this shoot I shot with a colour 120 film, and due to my limitations of printing and developing colour I had to get them sent off.
The colours on the film look far less real than the digital images, but I prefer the film. The colours make the blues look a lot lighter and cooler than the digital did. No doubt you could get the same effect with photoshop. In some ways the colour shoot looks a lot more like real life than the black and white does.
The other major differences with this shoot is that the angles I shoot from a free different from the digital SLR, due to where the view finder is on the TLR is from the top so you would have had to look down, which suited Maier perfectly when she took candid pictures in the streets as it wasn't obvious she was taking a picture.
Jason was experimenting with fire wool and long exposures and I took it as a way to help him and get a few shots with my film camera to see if it was as easy as it was using digital. Which it was, and came out just as cool as the digital. The only difference is the colour and you can see the person spinning the wire wool in the middle more clearly which gives it a different look to the digital. It is slightly out shaky due to the longest exposure was 2 seconds so had to hold it on bulb.
I think this shoot went very well. It worked as it looks so different from the black and white shoots I have been doing.
On the left is the film and right is digital.


Accidental double exposures

This was taken when I was doing my colour film comparison, I forgot to move the film on between comparisons and had to walk back to get some shots, that I later discovered they were not exactly like the digital due to this, as I forgot to take a reference.

Jason and a ceiling, camera had no stop to double exposures. But it came out pretty well.

Not accidental, Came out very well, It was more a test to see how to do a double exposure using the Nikon EM, which has a double exposure lock.
Sunday, 17 January 2016
Vivian Maier - revisited
I have decided to look back at Vivian Maier, This time I wanted to focus on her colour rolls of film. As I wanted to experiment with using both colour 120 film with the TLR camera and also do a digital comparison. So I will deconstruct some more images which are apart of her selection of colour film.
To see how different she used it to the back and white.
 |
| 1956
This picture was taken in 1956, using kodak colour film or something similar. It has been cropped to a square, which would indicate it was cropped during printing / scanning for artistic reasons or it was taken on medium format. Which is a higher quality of film than 35mm , but it for small images there is very little image quality difference. It is a candid picture of a woman with her hands behind her back. It was probably taken on her Roliflex TLR, which was her most used 120 film camera. Using the TLR it would have been easy to get secretive shots such as this. It was all the time when colour just being used but still for special events/ holidays as it was far more expensive than black and white so Maier would have been experimenting with colour.The contrast with the red dress and the blue water in the back ground that is out of focus draws you into the dress. She would have done this deliberately to see what colour film could do and what affect she would get with it. It would have been taken in Chicago as at the time she was working for a family there. A lot of Maiers images makes you question her thoughts behind the pictures she takes. Leaving you curious about what she was like.
|
 |
| 1976
This was taken on a 35mm range finder or SLR, Most likely her Leica IIIc. You can tell this by the cropping of the picture as it is a rectangle and you can see from the shadows that she is holding the camera up to her eye. The picture has been taken in colour film and is of a lake with a discontinuous lens held up to the horizon which splits up everything within this lens. It was taken in 1976 which was after her Chicago job, so this could be placed anywhere as in the 70s she went traveling all over the world. This was also when colour film was coming down in price , previously It was used but it cost 3 times the amount of black and white which is why Maier would have started to use it more commonly as it was cheaper and developing was far easier to come across as black and white developing had become less widely advertised. I like how you can see her hand holding the lens up and the light refracts though it. It is a landscape picture but it has some added attract elements because of the lens
|
Friday, 15 January 2016
Shoot 6 - Loomogrpahy camera

I found that the camera was easy to use and in the end I stopped taking time with taking pictures like I normally do with film. As there was no view finder I couldn't know what exactly I was taking pictures of and as there was no light meter or manual settings so a lot of the pictures came out under or over exposed. It was a camera made my lomography and was advised to use a 800 ISO film on a cloudy day. I used a 200 ISO and a 400 ISO. It was sunny for most of the time and I took a few shoots in the car and thought the lights would pick up, but they didn't and came out as black.
The whole shoot went well. I used the camera over a week and found that it a very different experience as it was a small camera that fit in my pocket that I could take spontaneous as there was no messing around with settings and focus, as it focused form 0.3m to infinite.
This is my first shoot with this camera and I would like to go on and look at other lomography articles and see what other interesting shoots I can do. I am also going to do another direct comparison shoot.

This was taken with the short timer and was a selfie with Jason and me. Due to the 4 lenses each strip is at a slightly different focal length.
 |
| This is someones hands moving over 2 seconds, it showed movement. It was badly exposed as there wasn't enough light inside. It works a lot better when you are outside. |
 |
| Took at arms length, short time and it shows the different angles each lens has. |
 |
| Over 2 seconds, got Jason to jump and you see that when I printed it I only printed 3 frames out of the 4. |
Lomogoraphy Insparation
Lomography is a company trademark that is in an attempt to bring back film photography. It uses lots of camera designs from Russia. It uses the designs and remakes them to sell. The also stock lots of different kinds of film ranging from different tints to standardised film, with the added extra of 16mm movie camera film and 110 film. They have developed their own range of cameras which include the 360 degree camera and the super sampler, which all have very unique and imaginative uses. I have used both of these cameras and due to me using back and white I got very different effects than the examples on lomographys website.
They also run a blog where I found that they show off their products and look into different techniques which I want to try a few of them. Such as:
- Double exposures
- Film destruction
- 35mm colour slides
- 360 degree cameras
- super sampler cameras
- expired film
- cross processing
- ect.
The platform in which lomography works is in the end a company who is making money, but there products have inspired many different people in there community to stretch out and test the limits of film and all the difference it can be, compared to a digital camera I can think of so many more ways a film camera can do that the digital couldn't recreate at all in post production, let alone in camera.I find that lomogrpahy users all have found what they like to do, some are still experimenting and tying things others have already done, but always add there own twist and skill to it.
 |
| This is a screen shot from the first page on there website of uploads from there users all the images are taken my some different and are all using different techniques and all take pictures in different ways. You have double exposures, fish eyes, cross processing, black and white photography, with all this depth and all the different ideas I'm sure lomogrpahy will be a big influence as I continue to use film |
They have a selection of cameras and lots of starter kits to introduce people to film, such as the Diana which is a box camera and uses both 120 and 35mm film and was based of an old camera Produced in the 1960 in Hong Kong but very quickly became less popular due to other alternatives. I find that they have made analog photography more into the main stream than it has been in the past few years.
Tuesday, 12 January 2016
Photo Dyes - Experimenting
While in our dark room I found a box of photo dyes. I decided to experiment with the colours and found that it works well on the white of the picture. So I chose some over exposed pictures and a few normally exposed ones to look at the different effects I could get with the dyes. My idea was to bring colour to a black and white print. I wanted to try to get realistic colours but in the end went for more surreal and obscure colours.


In the beginning I attempted to just paint the jacket and that looked good but I wanted to add a skin colour, but It was hard to get that colour using the selection of dyes I had. I also found it hard to stay in the lines as I used a big brush. I feel it makes him look like a tomato, but the blue has been diluted a bit which made it lighter than the original blue.

This was fun to do, I painted each penguin a different colour, and I like how I only dyed a small section of the picture. It looks very abstract as you would never find different colour penguins (unless they were sunburned) I liked that with this one I got slightly better at using the dyes and I was able to stay in the lines and I found a smaller brush to do so.
I liked using the dyes, I didn't use the dyes to how they are traditionally use, which was to add realistic colour to the picture, which is slightly beyond my art skills. I found that once you put the dye to the page you couldn't remove it, and so you had to be very careful.
Wednesday, 6 January 2016
A different View of Vivian Maier
https://www.youtube.com/watch?v=66oDaqgdTyI
Ted Forbes is a photographer who shares his passion through youtube. He did a video talking about Vivian Maier. He gave a very different perspective to her work. He likes her work, he thought It was questionable on how her work is being sold.
He said things along the lines of, that because she wasn't alive to produce her own work or tell the person who prints what she wants, Its very much John Maloof's interpretation of her work and how she wanted it printed. How a lot of the pictures that have been sold, are not the best and he thinks that Maier would have had something to say about what could and couldn't be sold. He also goes onto say that the documentary, the people who knew her, said that she would be horrified by what was going on with how things were being sold, as she was a very private person.
Further more with the tags that people add to her such as " turning point in street photography" where Maloof was the person who is pushing for this angle on Maier, which many believe was not what she would have wanted.
Wednesday, 16 December 2015
Cameras
 |
| Cannon T70 |
 |
| Lubitel universal 166 |
 |
| Fold out camera |
 |
| Lomogrpahy Super sampler |
 |
| Lomography 360 camera |
Shoot 5 - Disposable camera in colour
Taking inspiration from the Youtuber Dottie I have taken a shoot with 2 disposable cameras over the course of 2 days, and when even I wanted to document anything I took a picture. This was to force me to use film instead of using it sparingly. The pictures were taken in and around Reading University on a weekend when I was visiting my friend.
Dottie is a youtube who is very artsy and talks about subjects in a poetic way, and in one video she set herself a challenge to use 3 disposable cameras in 3 days, so I wanted to link that into the idea of using film isn't as precious as I have been using it and not thinking about setting and just shoot pictures.
I found that as they were so easy to use I was able to easily take pictured quickly as there were no setting to mess around with apart from flash.
The whole shoot has a nostalgia feel, It looks like the pictures I saw when I was a child. It really captured this feel of the prime time of film use. A lot of the pictures has this grain on it when it was taken at night without a flash. I took a few selfies, which in the context of when it looks like it was taken the selfie wasn't as common as it is now. I think the shoot went well, I used 2 cameras in 2 days and I struggled to do this, as I wanted to get perfect pictures when using film as I was paying for the pictures, in the end I used it as i would my mobile phone camera. I also found that in some cases the focal length of the picture is about 1/2 a meter which meant a few of my pictured were out of focus.
This is my first shoot in colour using a film camera, I couldn't develop them myself as our dark room wasn't equipped to do so, but I have got the negatives back so I can create black and white images from them if I wish. I also found that you don't feel as connected to the picture when you dont process it yourself, Its really just like using a digital camera but less expensive if you damage the camera.
I asked for it to be cross proceed but unfortunately I don't know if it was or wasn't, I would assume not as there is no evidence from the pictures. This I will now go onto look into a company called lomography who are trying to bring film back.
 |
| Duck pond in Reading, It looks old from how the saturation of colours are. It looks like old film, how I remember our family photo album. |
 |
| Swan on the pond, I managed to snap a swan, and after I took it it jumped out and spread its wings to Chase us, didn't manage to wind the camera in time for an after shot. |
 |
| Shooting from the hip doesn't work as well as you hope, I got a rather shaky picture, I like how it very |
 |
| Th thing about this picture is that it looks old, but we have added the twits that we are taking a selfie, which a modern thing that people use phones for. |
 |
| Running up the stairs so we could put pizza in the oven. The colours in the picture is very off what they were which adds to the old aesthetic of the pictures. It looks a lot like they could have been taken along time ago. |
 |
| In bed watching youtube, This looks very grainy which adds to the old aesthetic with a person using modern technology. |
Monday, 14 December 2015
Thisbedottie- disposable camera
Thisbedottie is a youtuber, She makes video logs and posts them online. They are mostly poems and creative throughs that she has come up with. This video inspired me to do a shoot. She talkes about how she set herself a challenge to use 3 disposable cameras in a day to make memories, even if they were not good ones. That didnt work, she struggled to use 100+ pictures in a day, so she changed the goal to 3 days 3 cameras.
The idea behind her taking the pictures was that she doesn't normally take enough to preserve memory, I wanted to use this idea to go against my grain and use 2 disposable cameras in 2 days and not care that it is film. As the mentality with film is waiting for the right shot and to use it sparingly.
This inspired me to use a disposable camera and to use colour with will be different to all the black and white I have taken.
Video Here
shoot 4- Camera less photography

The idea behind this shoot was to attempt cameras less photography in the style of man ray, and so I experimented in the dark room with movement and different textures and different objects that cast shadows onto the page. I found that water creates a different effect to a solid object. Moving hands over the page creates shadows and less time exposed so the image is slightly washed out. I then wondered how man ray would experiment with digital cameras photography today and I thought scanography would be a good places to start mixed with photoshop to create a surreal feel. I found an artist who was very simple with how she used a scanner, called Roberta Baily , who placed flower arrangements onto the scanner. Thomas Mc Donald used a scanner in a very unusual was and managed to take pictures of the streets, a set of houses from a scanner, which suits Man Rays style of surrealism which he was developing. I was unable to reproduce Mc Donalds work. I found that suing the dark room to create photograms was very hit and miss with what I could do, and sometimes it would work the others it wouldn't, this was also the case with the experimenting with the scanner. I found the photograms to be more rewarding than the scans, Due to how it was more freedom to add movement, rather than being restrained on the direction of the scanners scan.
To add to my experimenting of cameras less photography I used some light sensitive paint that works similarly to the dark room but requires the sun to use. I placed objects on tit and it came out as slightly lighter outline of the shape.
Overall my shoot and experimenting worked well, I think it showed that there is a big difference in digital and film. I preferrer to use the dark room with cameras less photography as there is a lot more experimenting and different techniques that are not realistic to recreate using a scanner.

In the dark room I spent some time experimenting with photograms which was influenced by man ray. I found that just placing object on a page on nearly any exposure would produce a photogram that had very defined white patches and very dark blacks. This is where I started moving the objects in the frame or adding my hands into the mix to create shadows.which brought out some very strange and cool effects for showing motion. Other things I discovered are using object that refract light differently can cause different effects. So water creates a ripple effect due to its refractive index , which is much the same with glass as well, and would imagine other object that are opaque would do something similar

I have experimented with light sensitive paint which is where you use a special pain on a piece of fabric and wet it with a sponge, then you place objecs on it and leave it to dry. This worked quite well for my first attempt at it, capturing the outline of the objects, much like a photogram but without a dark room. Also the paint was orange. This added to the more exciting look, only difference is it takes a long time so you cant use movement in the pictures.


I also looked into scnography looking at artists such as Roberta Bailey who both used the scanner in a different ways. I have also done a few and have looked at using peoples heads, and looking into objects and moving them around, much like I did with the photograms. This method of camera-less photography has the most colour as it scans in colour, which produces more of a contrast and real life feel than the photograms
Shoot 3 - Vian Maier using a TLR camera

which is a old TLR camera make in the USSR. It was one of the better cheap TLR cameras that didnt cost a fortune. Like my first shoot I was suing Maiers idea of documenting her life as she goes. I found that using the Lubitel, it was hard to accurately focus the lens accurately when trying to get pictures of people. I found that guessing the distances was a far easier option.
On the contact sheet there is a few scratches which is due to the glass cover on the frame when you are making the contact sheet, hence it is also on the other 120 film contact sheet.
Over the week I was taking pictures there was a mix of weather, I used my phone as a light meter so could get the aperture and speed on the camera right as I have not quite yet got the hang of guessing the settings for the camera, which is what Maier would have done. I found that using the camera to had to hold it at your stomach hight to use the view finder, It made it less obvious that I was taking pictures as I was walking. Which meant it would be easier to take pictures. They mention this in the documentary about Maier, and how probably the reason she used a TLR.
I think that over all It was a very good shoot. The negatives look very good, although the prints were not as I thought they would be. Due to the size of the negative being 6 x 6 It meant I had to crop them. I found this harder to do than I thought. This didn't stop me but I found that I will have to think about my composure next time I use this camera.
My favourite picture that came out well as a negative and in print was a picture of the harbour, In the picture the clouds are really defined and look very real. It was taken at a speed of 1/60 with an aperture of f 18 Due to the sun being behind the cloud giving a lot of light into the lens. I like that it is in black and white as I was able to print it myself, which adds to the excitement of a good picture coming out.


We went to a wild life reserve and the penguins were apart of the enclosure. I wanted to get a contrast between the black and white penguins, It was harder than I thought to get the contrast. In hindsight I am now a lot better at making the white on the pictures white. I may try this again. I found it hard to take this picture as to use the view finder I had to be looking down. This was hard as there was a rail around the enclosure the same hight my camera was at.

This is my best print. I haven't done any post production, But the picture looks far better physically, the scanner quality doesn't do it justice. I like the picture a lot. I like how its done in 3rds and how the clouds look alive. I used a high f stop with this picture which would around for the wide range of detail in the picture. I think the focus was also in inmate setting so that would also add to the depth of field in the picture.
Subscribe to:
Posts (Atom)