Showing posts with label Unit 1- View Points. Show all posts
Showing posts with label Unit 1- View Points. Show all posts
Friday, 15 May 2015
Time laps of final Piece
For addition to the 6 pictures, my final piece also has a short clip of the skies in a time laps. It's only 10 seconds long and will play on repeat next to m final pictures. This will show hoe the sky got from one to the other. Located on my space on the school system.
Tuesday, 27 January 2015
Final Evaluation
My initial intentions were to explore the way that I could use the camera and the features that a camera can use. I think that I worked well and was able to achieve my intentions. I started with the use of flash, linking in my artist Heather Buckley. She used the idea of lighting up the area using flash which gave a bright and vibrant setting to her pictures. Then I found a different technique called time stacking and linked the artist Matt Molloy with my work which produced some wonderful sky line pictures which showed the passage of time excellently. This took time to get the pictures for time stacking. As you had to use an evening to get the all the pictures you needed , which could have been from 10-100 pictures. After using film as my influence which helped me look at another view point of a camera. This helped me compose better due to the functions of the film camera slowing my thought process for taking pictures which I applied to another time stack shoot. The difference between my 2 artists are how they take the pictures, as both are very bight and colourful oh whole. With Buckley her work is very candid while Molloy is very planned and thought out. I could have done some of my shoots initially better and used their influence later on which I tried to do later on but not to the extent I wanted. I also would have liked to spend less of my shoots on time stacks and used another technique to show off the view point of the camera. Although saying that I would have preferred to have more opportunities to do time stacks because I enjoyed making them and using the influence of Matt Molloy which I have linked to my final piece.
Monday, 26 January 2015
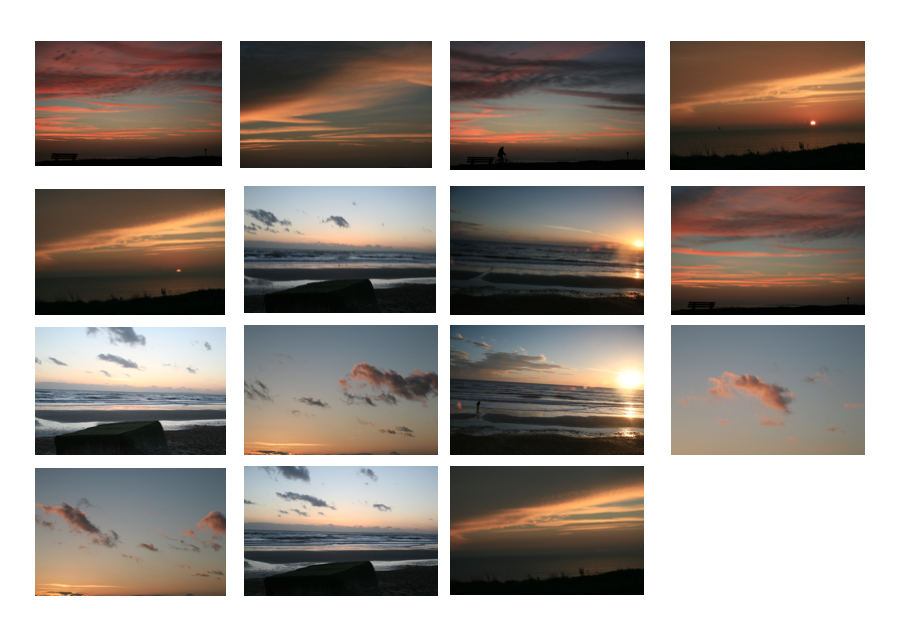
Final Piece
This is the final idea, It shows the time stacks in the centre with the first and last frame of the stack ether side. In this lay out it show the passage of time reading from left to right. Further more the first line is a sun rise and the second is a sun set. This shows the passage of time from morning to night. There is also a contrast in colours which adds a divide between the morning and the evening.

Friday, 23 January 2015
Development of timestacks- faces
This was an experiment to see if I could develop my time stacks with something other than sky. I did this a while back with myself and a timer to experiment with how time stacking worked and how to achieve it in photoshop. I got another student to help with this experiment.
 |
| This was taken when my subject was rotating on a spinning chair. I have edited it similarly to how I edit the sky time stacks. I used flash due to the lack of light which had the effect of illuminating the subjects nose. Consequently you can see a trail of noses slide across the subjects face. |
 |
| This was taken when the subject was rotating his head in a circular motion without moving his body much. This resulted in a complex view of the subjects face. He has many eyes dotted around his face. Using flash again, this added a bright glint in the subjects eyes.It also looks like the glare in glasses in his eyes, but he didn't have glasses on. This made his eyes more predominant in the picture which made it so the eyes more visible when they were blended . I also can see many other face. Such as the subject himself, and old man, a bold man. Which is a different effect to the other picture. |
Friday, 16 January 2015
sixth shoot edits
For the 6th shoot I used time stacks for a 3rd time, so I could use the influence and what I had learnt from using film cameras added to my previous shoots at looking at Matt Molloy.
 |
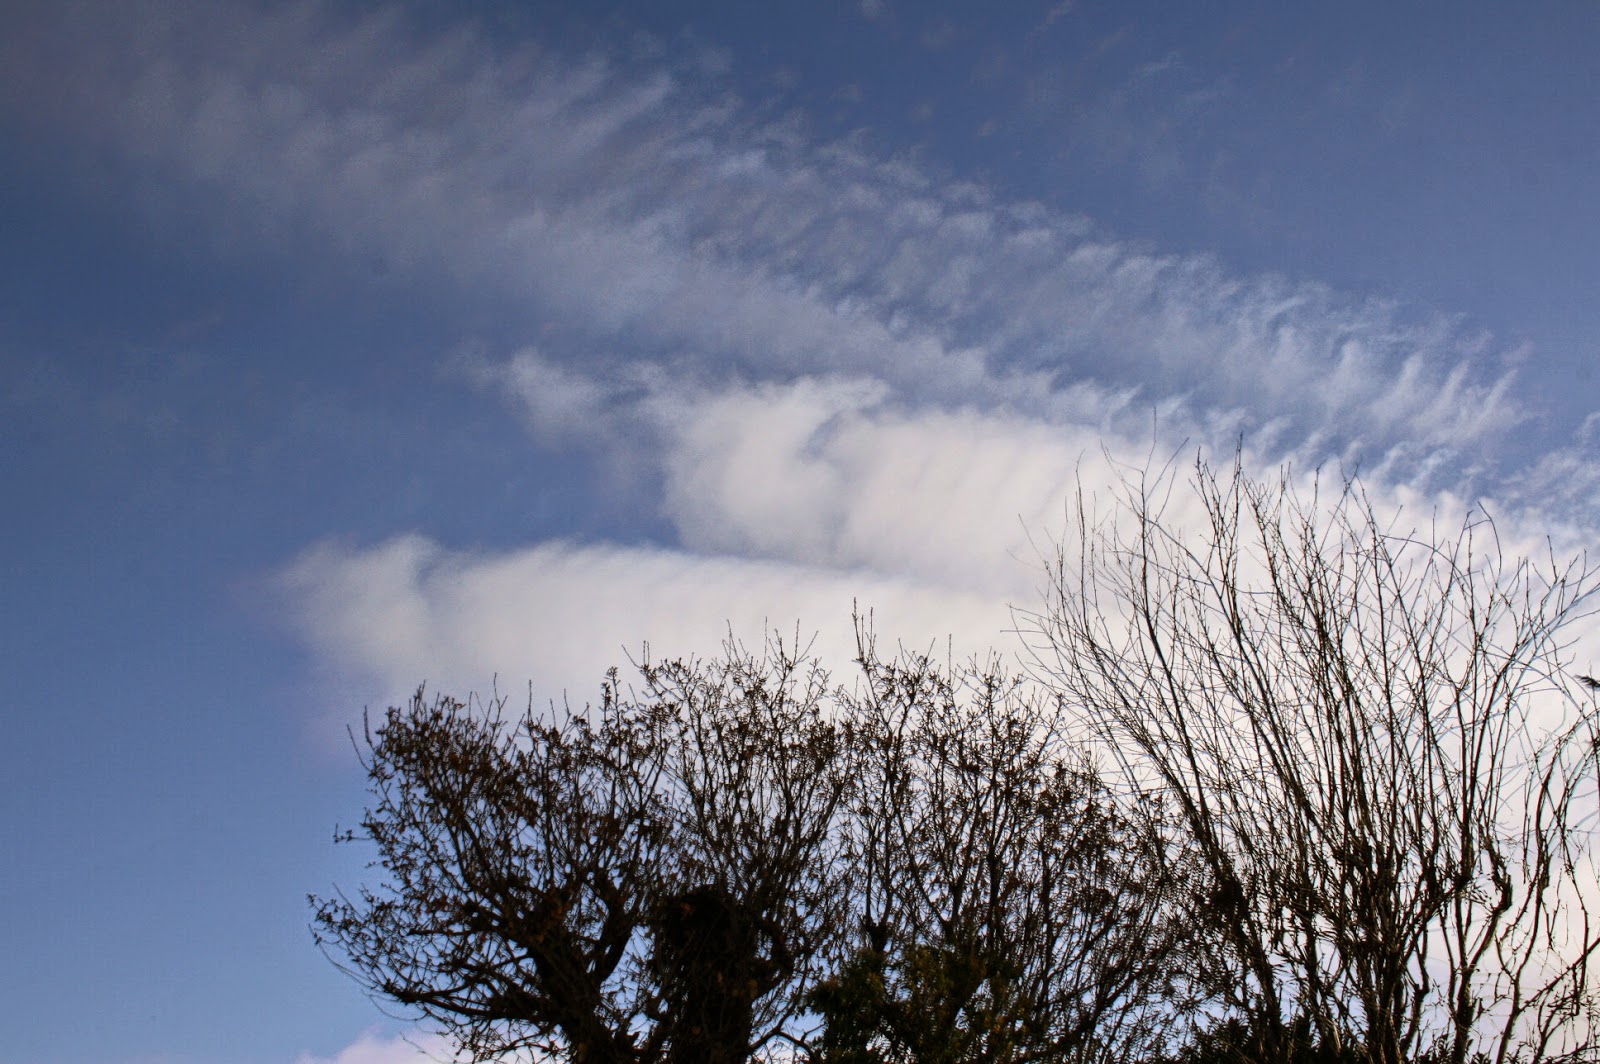
The picture was taken in the middle of the day, I saw a gap in the cloud and wondered if it would have a different effect with how the sky would have the illusion of being dragged across the sky. This effect is different from the rest as even though its blended to lighten it kept all the dark clouds around it. This isn't one of the best pictures that I took but it was an experiment. I took the pictures every second, this shows how the clouds are moving fast. Even though it didn't have the effect I wanted it showed that even when there wasn't a lot of light in the sky there are bits that will show up, which helped to identify potential pictures from the rest of this shoot
|
 |
This picture was taken in the morning and as a result it produced a different type of colour which was a different experience due to all the other time stack shoots have been taken at sun set. The original pictures had more dark clouds in but due to the blending they have disappeared and reviled the colours. This picture looks very painted which is the effect Matt Molloy uses. I think that this has been one of my best shoots as I have improved how I compose and take pictures.
|
 |
This was a sun set from a bedroom window, the sky ranged from brilliant red sky to dark sky. I tried to section the horizon and the sky into thirds to make it more aesthetically pleasing. The foreground is darkened as they its blended to darken. It was taken over an hour, just before the time of sunset. It was on a timer of 15 seconds which I should have changed to a smaller number as in this picture I didn't capture the motion as much as I thought it would.
|
 |
| This is a picture of the needles on the isle of wight, It was just after sun set as my timing was off for how long it would take me to walk, the needles are out of focus but the time stack was only 7 pictures as I have gave up, you can sort of see a motion in the clouds. |
 |
| This is another time stack where I saw gaps in the clouds, this one worked a lot better due to the direction of the clouds going over my head, rather than across, This was possible as I changed my location. To somewhere completely different and was able to get pictures without lots of houses and buildings in the foreground, This is very similar to how Matt Molloy does it but I was always unable to find a location with cloud going over instead of in the distance. |
 |
| This is also one of the better pictures i have taken due to the range of colours, the direction of the clouds and how its been composed. The film influence helped me to notice and recognise a potential good shot from a bad one. This encouraged me to plan ahead, This was an earl morning shot, I had to get up early to capture the pictures and this produced a wide range of colours and a strange trails to the clouds which I should have continued on for longer but i was unaware that i would create this effect from the clouds I was taking a picture of |
 |
This was taken from a window, this is evident from the reflection in the bottom left corner. It consists of 100 pictures taken through the day. The day I chose had a very slow moving sky, this is why it has some elements of sun burn on the top right. I composed it to be in thirds with the sky taking up the majority of the picture. As this was taken during the day there are not as many interesting colours or features in the picture.
|
Sixth contact sheet

This is my 6th shoot, after my adventure with using a film camera I decided to use the skills of composing and thinking before I shoot to use in a time stack, which is an influence from Matt Molloy.
This shoot I had my final piece in mind, to combine with some other shoots to produce my final response. Due to this I wanted more impressive sky shots. Most the pictures were taken on a hill on the isle of wight. This is a totally new location than all my other shoots, and some were out of my bedroom window to experiment with using a timer and what different times will do. I also experimented with different times of day, such as on the bottom row It show pictures from sunrise , middle of the day, and sun set retrospectively. The pictures from the morning turned out to work well but with less colour in the sky. A lot of the pictures are very dark with a bright sky which is how the time stack effects what I am trying to achieve, the time stack.
I also developed a few into time lapses, which gave a different view on the passage of time. This is something Matt Molloy has done too, which can be found on Youtube.
The film influence has encouraged me to plan and think about the shot I am composing before I start. I think it has improved my work massively, As my planning has improved and I have optimised my time to getting the best pictures, such as how long it will take, etc. I have also improved my composition and how I think about where the ground is in relation to the picture.
For my final piece I might do a re-shoot, or just use the pictures from my project so far. To make a piece with an array of sky.
Thursday, 15 January 2015
Smoke - development
 |
| Time stack of smoke with levels edited |
 |
| Gif of the smoke in a time laps |

Instead of using the sky I thought about using an incense burner with a flash in a dark room. This defines the smoke as it came out of the tip of the incense. I made it into a time laps and a time stack, where I think it turned out differently to the sky time stacks. I prefer the sky due to the range of colours and textures but doing this has linked in the flash which I used in the 1st and 2nd shoot. The picture on the left is not using a flash and from what I see, I prefer the use of flash. Although a different use of flash, not the technique fill flash.
Fifth Contact sheet and edits

My fifth shoot was influenced by using a film camera. I took all my pictures using a Cannon T70. I took my time while taking pictures. I tried to compose my shots more by slowing down the shooting process which is easy with a film camera as you have to adjust the settings more and think before you shoot. This has encouraged me to improve my skill.
 |
| Best edit - Picture of girl walking in the woods taken in film. |
 |
| Tests in dark room, experimenting with exposures with the projector |
The best edit is of a group of trees and in the distance is a subject, a girl. It's a candid shot and Is one of he pictures that has a very large range of gradients of grey. It is slightly out of focus and is very over exposed and not developed enough so a lot of detail didn't get into the picture.
The other print I enlarged was a group shot of 4 people from inside a gap in the hedge so I got the branches in the picture encroaching on the group. This picture again was over exposed in the enlargement process and needed more time in the developer as if i hadn't taken it out it would have gone black.
My time in the dark room has been a lot of trial and error. I have learnt a great deal towards how important post-production is in both film and digital, but use of a different medium do so. I think that further more I have learnt that the more time you spend taking the picture the less post-production you will need. This will improve my digital in taking more time in my shoots.
For my next step I will return to taking time stacks taking the skills from film and apply it to digital which will develop my ideas further.
Tuesday, 13 January 2015
Experimenting with time laps


With my time stacks I decided to Develop them into time laps.
To do this you need to go to file --> open and open the file ,with all the pictures you need to do a time laps with and tick Image sequence. Which will open a window that lets you select the frame rate. I used 24 fps. And saved it to web.
I like the first one due to the range of colours although the resolution is not as good as the second Gif. But the second one is a larger file and doesn't play through all the pictures that it should play through which can be fixed but at the cost of the resolution.
I think that the time stacks have a more striking effect on the audience than just moving clouds, Although its a different medium I can portray my work.
Wednesday, 7 January 2015
Matt Molloy Youtube help
The way I learnt how to make a time stack was a helpful video by Matt Molloy, where he demonstrates what he does and other ways of doing it which are less time consuming. Here
This was very helpful as it showed me that I was able to do more than 20 pictures before I would get bored of inserting pictures, this enabled me to use 100s of pictures instead. Enabling me to create more motion in the sky due to the less time between pictures I could achieve.
This was very helpful as it showed me that I was able to do more than 20 pictures before I would get bored of inserting pictures, this enabled me to use 100s of pictures instead. Enabling me to create more motion in the sky due to the less time between pictures I could achieve.
Sunday, 4 January 2015
Film Influence
My influence for the final leg of my journey at the view point of the camera is film. I was always intrigued with learning how to use film and develop it. And even when experimenting with film things have not always gone to plan. I am using film to improve my skills of composing and thinking about what I take before I shoot. This will help me improve my time stacks which I intend to continue with due to how much I enjoyed making them, with the added bonus of creating an incredible view point of the sly/world from my camera.
Alexander Rodchenko is a Russian photographer in the 1920s . But before that he was and artist and sculptor which would have had a big influence to how he saw the world, which can be seen in how he composes his photography. A lot of his pictures have got political view behind them as well.
This picture has been taken of people working from a roof top. It is landscape, It has been taken using film, due to the year there wasn't much choice in what he could have used. I think the black and white shows that it this work is from another time. His pictures are taken in Russia He has composed the picture to have the roof line going diagonally across the picture, which splits the picture up nicely with whats going on, on the roof and down on the ground. The workers on the ground level and the people sitting down playing musical instruments on the roof. This gives a contrast in the different types of work going on. Further more with the orchestra there you can just imagine the sounds that Rodchenko would have heard.
 |
| Alexander Rodchenko -Working with an orchestra 1933 |
This picture has been taken of people working from a roof top. It is landscape, It has been taken using film, due to the year there wasn't much choice in what he could have used. I think the black and white shows that it this work is from another time. His pictures are taken in Russia He has composed the picture to have the roof line going diagonally across the picture, which splits the picture up nicely with whats going on, on the roof and down on the ground. The workers on the ground level and the people sitting down playing musical instruments on the roof. This gives a contrast in the different types of work going on. Further more with the orchestra there you can just imagine the sounds that Rodchenko would have heard.
 |
| Barbra and Michael Leisgen- work from nemesis 1970 |
This is a picture by Barbra and Michael Leisgen they were trying to achieve "the recording of a natural imprint, research into the body theme and experiments with Land art." I like the way that they have composed the pictures with the horizon in the middle, and the person and a feature in a cross in the centre.They took this with film and it's slightly tinted a different colour to normal black and white which I am not sure how that has been achieved but it adds a sense that it is an old print. They set out with a purpose to capture how man can imitate the land and leave marks on the land which show that they planned out what they were going to take. This is evident in all there pictures cause of the arms of the person is lined up with the lines on the horizon. This is what I am taking from film is that I will improve my use of spending time on composing my shots.
 |
| Bill Owens - suburbia series 1972 |
His pictures of this time shows a typical middle class household in California in the 1970s, unlike Barbra and Michael Leisgen ,a lot of Owens pictures in the suburbia series looks like every day life, They have the sense that he was there and just took the pictures, much how I have already experimented with a film camera, He would have had to anticipate what was going to happen with all the settings on the camera. The pictures in the series use film and is all in black and white, which gives it a more simplistic look. I think that the picture above shows what Owen was trying to capture with this section of his work. It shows a normal family in front of there car about to go on holiday with their boat. I think that using film gives pictures a more raw feel to them as , yes you can edit the pictures but it's a lot easier to get things right before you take the picture. There is a lot more thinking before you shoot not shoot 100s of pictures and end up with a few good ones that you can edit later.
I will take from film the way in which I think about taking pictures and how I will compose my shots, I will do this by doing a shoot in film first before taking the skills onto digital to improve my digital work.
Tuesday, 23 December 2014
Fourth shoot edits
 |
This is 3 pictures edited in different ways. The top left and the right are the original 2 pictures with one blended to lighten and one blended to darken. This created a light and dark image so most the dark clouds were visible in the dark section and all the light clouds visible in the light setting. Then I experimented with an idea to see if blending both the darken and lighten would create a different effect. This produced the bottom left picture. This is a big contender to be one of my best edits of this shoots.I think that this picture shows off the sun set that happened with all the colours and motion in it. The colours of both the lighten and darken can be seen in this picture and it shows highlight in the cloud which is where the attention is drawn to in the picture. This has captured what Matt Molloy does with his work. His work has influenced me with how I use post-production software to change the view point of the picture. Although with some more time I could produce better pictures, like this.
|
 |
| This picture was taken after the sun had set, which enabled me to capture the after burn of the suns light hitting the clouds. This captured the motion of the clouds moving across the sky. It also blended the darker clouds which is why i gained a deep purple on the top of the picture. I am drawn to the bench in this picture, this is because it stands alone in a vast sky. The bench has been doubled up due to some camera shake, which would have changed the sky as well, but was unable to identify the frame that had a different bench position. This is something I will need to look at if I do it again, use a timer or a remote with a better position for my trip-pod. So I don't get frames that are different. |
 |
| This picture is of the sun setting and I stopped just after the sun had disappeared under the horizon. This is an interesting edit with the sky and the water being effected by the time stack. The clouds are a blend of the sun setting and all the colours that the sky had to offer. It wasn't as good as some of my other shots but the interesting part is the water. It looks extremely smooth. This is the opposite to what happens to the sky, It looks still and calm compared to the motion in the sun and sky. The sun is a very dominant feature in the picture. Slightly over exposed but it really draws your attention, especially with the reflection of the light in the water which is also a blend of the light from the sun setting. |
 |
| This last one is where I have tried to compose the shot more than the others. I spent more time looking at the 3rd rule and having a subject. The subject was the rock which is covered in green moss and is very damp as it is covered in water a lot of the time. The pictures were taken after the sun had set so I captured the light after the sun had gone. This gave the effect of a slowly changing gradient of colour in the sky. The clouds were not as successful as the other pictures with the capturing the motion. This is something i would like to combine in my next shoot with time stacking. |
Saturday, 13 December 2014
Fourth Shoot - Contact sheet
This is my fourth shoot it was taken in the same location as the third. For this shoot I took advice from reviewing my artist. I looked more into planning my shots and when to take them. In the week I was taking these pictures I was constantly aware of the weather and how it would work in a picture. This made me plan out my day, which is what I learned from my artist.
This shoot was very successful as I managed to get the time stacks to work. The shoots took place on 3 separate evenings as each evening I was only able to get 2 pictures in each night before I ran out of light.
The pictures on the contact sheet are not the final edited pictures. They are a selection from the 100s of pictures I took which all have been used to create a finished time stack. There are some pictures that are similar as they would be used in the same time stack, although they are slightly different in the clouds positions and colours. The end results in most cases were really good as the ones with the sea in frame produced a motion on the water as well as the clouds.
Picture 1 turned out to be the best one due to the array of colours that are in the final picture. This was the desired effect of the shoot. I think that with another shoot I will be able to get this to work even better, I might need to add in a timer so I eliminate the movement of the camera that is evident in some shots.
After a bit of experimenting in photoshop I blended the same picture edited to lighten and darken which produced a very interesting effect which looks similar to my artist Matt Molloy.
I will look at another artist or technique to gain more influence on how to compose my time stacks. Such as looking at how film cameras need to be set up and shots need to be anticipated, doing this as this should improve my time stacks. Further more using film would like to look at composing shots better. This is the direction I would like to take my work.
Friday, 12 December 2014
Matt Molloy review
After my third shoot, I came to the conclusion that I needed to develop my composition and attempt to get the colours and the motion on the sky into one shot. Although I felt that the pictures didn't turn out as I wanted as they didn't reflect my artist as much as I would have liked. This was due to how I didn't think plan out the composition. Further more I chose the day were it couldn't work, this is because of the clouds.
Matt Molloy says “Sometimes the clouds are moving quick and there’s lots of them. If I stack too many photos from a time lapse like that, it can get a little messy,” This shows that I will need to plan out how I edit the pictures, which I will need to experiment more.
“For every day that I don’t shoot a time lapse, I probably shoot two the next day,” This shows that he puts a lot of effort into the picture taking and when he can't do one day he will do more later. Which is something I will need to put into my own work.
 |
| Winter Warmth - Matt Molloy |
This s a picture that was taken during the winter but has a warm glow about it, Molloy does this with his pictures and names them things that relate to the picture. It is another time stack done my Molloy. The colours that have been captured are red and orange where the sun is setting.
The time stack was taken using a tripod and a timer. This has been taken over an hour or so, and has been stacked with 100s of pictures.
The artist says that he does at least one time laps a day and experiments with different days, which preserves the day, as you won't get the same effect twice as clouds are forever changing and moving in different directions.
It is a landscape picture, with a lake and trees.The trees are all darkened due to how the blending of the pictures has been set to lighten so all the dark spots are over exaggerated.
The nature of this photography is you never know what you will get, with this picture it is slightly different. As there is normally more movement and more colour in his work, this does have colour but in a slightly different way to the picture below. This picture displays a warm feeling, this may be due to the title or the sun. Added with all the reds and oranges which we relate to as being warm.
This picture is called Red Swoosh, This describes what the picture shows, this is like a lot of his work, and how he names his pictures. The picture has been taken at a sun set where the colours of the dark sky collide with the suns rays bouncing of the clouds. This gives it a warm feel.
This is another time laps of his, which his work primarily consists of.
The trees are darkened as the picture has been blended to lighten. The picture shows that the clouds moving at different speeds with some streaks smoother than others. This is the effect I will be trying to get with my first shoot, but I that wasn't as successful as I thought I would. Molloy plans his out and keeps persevering with shoots as some don't works and that's how photography works.
The time stack was taken using a tripod and a timer. This has been taken over an hour or so, and has been stacked with 100s of pictures.
The artist says that he does at least one time laps a day and experiments with different days, which preserves the day, as you won't get the same effect twice as clouds are forever changing and moving in different directions.
It is a landscape picture, with a lake and trees.The trees are all darkened due to how the blending of the pictures has been set to lighten so all the dark spots are over exaggerated.
The nature of this photography is you never know what you will get, with this picture it is slightly different. As there is normally more movement and more colour in his work, this does have colour but in a slightly different way to the picture below. This picture displays a warm feeling, this may be due to the title or the sun. Added with all the reds and oranges which we relate to as being warm.
 |
| Red Swoosh - Matt Molloy |
This is another time laps of his, which his work primarily consists of.
The trees are darkened as the picture has been blended to lighten. The picture shows that the clouds moving at different speeds with some streaks smoother than others. This is the effect I will be trying to get with my first shoot, but I that wasn't as successful as I thought I would. Molloy plans his out and keeps persevering with shoots as some don't works and that's how photography works.
Saturday, 6 December 2014
Time Stack - How Its done
 |
| First you need to have taken a few pictures with the same position but with slight changes to the background, e.g. clouds or colours in the sky or movement. Then set the first or the last picture as the background (first image you open in Photoshop) depending on if it is the first or last it will create a different movement of motion. |
 |
Then there are many ways to get the layers on top of your background picture.
I just dragged the file from its folder 10 at a time. I did this going in order of when the picture was taken.
|
 |
| Next you need to select all the layers , but not the background. Then change the drop down from normal to lightened. In some cases changing it to saturated in some frames can bring out more colour. |
 |
| This is where you can change the shadows. Ideally you want the shadow at 0 and the rest of the options you can edit to see how you like it. The one shown above is how I have set it for most of my pictures. |
 |
| When you are happy with the balance of lightened for each picture save it, Then you will want to merge all the layers together by right clicking when the layers are hi highlighted. Then you will want to still have the merged layers elected and go to shadows and hi lights. This will open a menu. Then you are done, you can also edit the levels of the picture to but you still have to merge the layers to effect all of them with your adjustments.
This is the out come of some of the pictures from my 4th shoot, as you can see, I have taken pictures of the sky and managed to get the verity of colour. Also have managed to caption the motion of the clouds.
  |
Third shoot - Contact sheet and best edits

In Preparation to this I had to look up the times for the sun rise and sun set this was at 7:30 and 16:00 retrospectively at this time of year. Further more I required the weather to not be too cloudy with wind to show motion. This enabled me to go to the location at the correct times to get the picture I wanted.
My first attempt at using this was my pictures of the trees, my thoughts behind it was that the motion of the trees in the wind. This didn't work as well due to how the tree moves around in a circle so the motion just makes the tree looks like a blurry tree. So I decided to focus on the sky more, with the clouds. Matt Molloy even says that trees are hard to get right in his picture and tends to avoid them as a main feature in his pictures.
The top 3 rows are pictures from the shoot and the bottom row are the finished edits. I used time stacking in photoshop and blending them to lighten.
This worked with the picture 16. As you can see the stacking has produced a tail that the clouds move along. It was taken with a remote while a lot of the other were not so I had some problems with camera shakes due to the lack of a remote. This was achieved in post-production in photoshop by layering about 30 pictures and blending them to lighten, Another point is that the trees worked in this one more as there was little wind on the ground. The trees are also black due to the blending to lighten, as the trees are dark and get made darker.
 Picture 13 is one of my best edits where I took a time stack of the sun setting. This would have been a better image if there were less clouds but there were some colours that managed to get through and gave the brush like effect of motion. Although I still need to include something other than the sky in my pictures, such as an object or a tree but, trees move in the
 wind,
I feel that I did not manage this shoot as well as I was planing to, I will need to go back and review how Molloy does his work, and will have to choose better days to go out and take pictures.
For my next shoot I will try to develop my composition and attempt to get the colours and the motion on the sky into one shot. This will mean I will have to monitor the weather to get the best day to take the picture. Further more I will use a remote to control the movement of the lens or a timer so I can create a constant stream of pictures.
Sunday, 30 November 2014
Time Stack test

After finding my artist Matt Molloy, I thought I should do a quick test to see if I was capable of achieving the Time stack effect. This shot was taken with a camera and a remote to set off the camera. I used a tripod to keep the camera in the same place. I took 15 pictures but in my actual one will take more.
When I do this outside I will have to use the remote or make sure not to shake the camera. This is because I don't have the device to take time lapses with and can't obtain one quickly.
I learnt how to do this by following a YouTube Video that Molloy had set up himself. here
Matt Molloy- art history
My artist is Matt Molloy is a Canadian photographer who uses timelapes and stacks the 100s of pictures on top of each other then blends them together to create breath taking effects on the sky. The clouds look a lot like paintbrush smears on the sky. The number of pictures he uses depends on how far or slow the sky is moving. He has a few tutorials on youtube which explain this effect and how he archives this.
 |
| Smoke Stack - Matt Molloy |
Molloy uses a camera to take pictures with a device that can take time lapses. The colours used in this picture as somewhat dull. The majority of his other pictures are taken of the sun setting so that all the colours of the red , yellows and blues are in his pictures but not this one. I think this is due to how this is a picture of a power plant and the lack of colour could show that it's polluting and unnatural.
Molloy focused the picture on the chimney stack which brings your attention to the smoke bellowing out of it. Due to the time stack he has used it simulates motion of the smoke coming out of the chimney. This gives it an animated style look. The picture is taken as a landscape. This makes the picture also seam like a view which has been ruined by this chimney stack.
The picture has also got motion in the sky and on the trees. This is shown by some blur and motion in the trees. The sky is in streaks which give the sky motion, this also gives a passage of time.
 |
| After burn - Matt Molloy |
This next picture is called after burn. This is because to looks like fire in the sky with all the colours of the setting sun. This is what a lot of Molloys pictures look like. This again uses time stacks and has a lot more pictures in than the first or there was a larger interval between each picture. It shows the passage of time in the sun set and displays how all the colours can come out of the sun set.
This shows how the picture is natural, there is no man made element to this picture unlike the previous picture. It shows how beautiful the simple things are, like the setting sun.
What I also like about the picture is how the sky has also been reflected in the water at the bottom of the picture and the land around has been under exposed to get very little detail in. This shows how the artist wanted to emphasise the sky and the water with the blended colours through the picture.
This picture is almost surreal and unnatural but natural at the same time due to how in reality you won't see the colours at the same time but with a camera you can. This is what I hope to achieve my taking pictures using the time stacks. I will take the time staking element and start experimenting with it to produce more work.
Friday, 28 November 2014
Second shoot- Contact sheet and best edits

With this shoot I had to get up early so I could use the best light at the beginning of the say, such as the first picture where the sunlight illuminates the tree.
This is my second shoot where I went for a walk and found different buildings and plants for photograph. The majority was taken down a street, where I found a roof with moss that I could just reach. I think that the Fill flash was very evident it lots of the picture where there are a big contrast between the dull sky and leaves. This can be seen in 9 and 6 from the contact sheet.
The pictures of the moss on the room, in some of the pictures could be mistaken for a landscape. The moss makes it looks like rolling hills. The fill flash was unsuccessful in a lot of my pictures much like the first shoot. This is due to how the weather conditions effect the fill flash. How the blue of the sky can't be shown.
Heather Buckley is really good at getting interesting angles and bright colours into her pictures, I attempted this with my second shoot, In a few of the pictures I managed this but most I did not.

This is my best edit, I have used the levels to adjust the colours which made it look slightly brighter and the colours contrast more. I took the picture with aperture of f/5.6 and a shutter speed of 1/200. This was due to how hard it was to get a view of the roof the picture was taken of.
For my next shoot I am changing artist to look at another technique, so I can expand my knowledge of techniques that can be achieved by using the camera. This will help me gain an understanding of the view point of the camera.
Monday, 24 November 2014
Heather Buckley - Review
After my initial shoot I discovered that fill flash brought a brightness to the picture. I like how fill flash produces a crisp blue sky in the background but as I have found out is hard to do it on a cloudy day.
After more in depth review I have discovered that Buckley also uses a lot of bright colours in her work. For instance this picture was taken in Paris and has a wide range of colour. This contrasts to how I took my pictures which were very green and brown and contained little variants. The colour pallet of this time of year is very small anyway.
This picture is taken from a low angle, out side of a metro station in Paris so you would get a candid picture of the people walking. It would have been taken in morning or in the evening when the trains could have been getting busy.
In the picture she got in a reflection of the sky in the glass windows to the left.
The colours of the sky and building contrast the flowers in the foreground due to there being different colours. The flowers in the front of the picture has been lit up by the sun or the use of an external flash.
There are lots of different textures in the picture, such as the sky and the glass being smooth , while the flowers have a texture and the buildings are rough.
The picture gives the over all feel of a weekend due to the lack of people in what could be a evening or morning.
The sun was nearly blocked out by a person who happened to be walking out of the metro station. This gives a glare effect on the picture.
From my in depth review of some of Buckley other work I was able to discover that I need to look more in-depth into the contrasting of different textures and colours. This will make my pictures, while experimenting with fill flash, look better than I was able to take before hand.
After more in depth review I have discovered that Buckley also uses a lot of bright colours in her work. For instance this picture was taken in Paris and has a wide range of colour. This contrasts to how I took my pictures which were very green and brown and contained little variants. The colour pallet of this time of year is very small anyway.
 |
| Contre Jour outside the Metro Paris France |
In the picture she got in a reflection of the sky in the glass windows to the left.
The colours of the sky and building contrast the flowers in the foreground due to there being different colours. The flowers in the front of the picture has been lit up by the sun or the use of an external flash.
There are lots of different textures in the picture, such as the sky and the glass being smooth , while the flowers have a texture and the buildings are rough.
The picture gives the over all feel of a weekend due to the lack of people in what could be a evening or morning.
The sun was nearly blocked out by a person who happened to be walking out of the metro station. This gives a glare effect on the picture.
From my in depth review of some of Buckley other work I was able to discover that I need to look more in-depth into the contrasting of different textures and colours. This will make my pictures, while experimenting with fill flash, look better than I was able to take before hand.
Subscribe to:
Posts (Atom)