Labels
- After school and onto uni! (2)
- Alphabet (5)
- Portrait Mini Task (7)
- Unit 1- View Points (23)
- Unit 2 - Relationship (25)
- Unit 3- Film Vs Digital (25)
- Unit 4- Truth Fantasy or Fiction (19)
Tuesday, 23 December 2014
Saturday, 13 December 2014
Fourth Shoot - Contact sheet

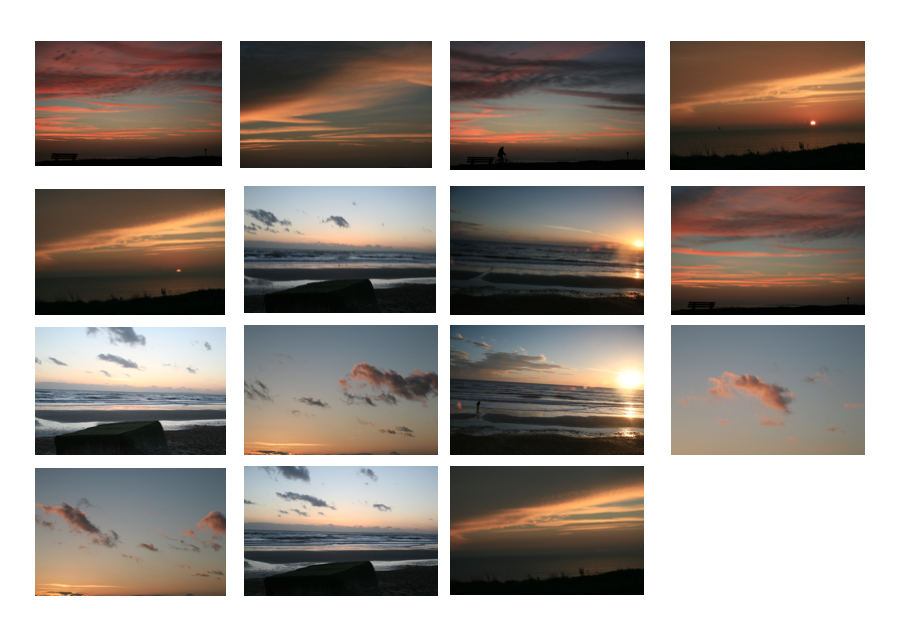
This is my fourth shoot it was taken in the same location as the third. For this shoot I took advice from reviewing my artist. I looked more into planning my shots and when to take them. In the week I was taking these pictures I was constantly aware of the weather and how it would work in a picture. This made me plan out my day, which is what I learned from my artist.
This shoot was very successful as I managed to get the time stacks to work. The shoots took place on 3 separate evenings as each evening I was only able to get 2 pictures in each night before I ran out of light.
The pictures on the contact sheet are not the final edited pictures. They are a selection from the 100s of pictures I took which all have been used to create a finished time stack. There are some pictures that are similar as they would be used in the same time stack, although they are slightly different in the clouds positions and colours. The end results in most cases were really good as the ones with the sea in frame produced a motion on the water as well as the clouds.
Picture 1 turned out to be the best one due to the array of colours that are in the final picture. This was the desired effect of the shoot. I think that with another shoot I will be able to get this to work even better, I might need to add in a timer so I eliminate the movement of the camera that is evident in some shots.
After a bit of experimenting in photoshop I blended the same picture edited to lighten and darken which produced a very interesting effect which looks similar to my artist Matt Molloy.
I will look at another artist or technique to gain more influence on how to compose my time stacks. Such as looking at how film cameras need to be set up and shots need to be anticipated, doing this as this should improve my time stacks. Further more using film would like to look at composing shots better. This is the direction I would like to take my work.
Friday, 12 December 2014
Matt Molloy review
After my third shoot, I came to the conclusion that I needed to develop my composition and attempt to get the colours and the motion on the sky into one shot. Although I felt that the pictures didn't turn out as I wanted as they didn't reflect my artist as much as I would have liked. This was due to how I didn't think plan out the composition. Further more I chose the day were it couldn't work, this is because of the clouds.
Matt Molloy says “Sometimes the clouds are moving quick and there’s lots of them. If I stack too many photos from a time lapse like that, it can get a little messy,” This shows that I will need to plan out how I edit the pictures, which I will need to experiment more.
“For every day that I don’t shoot a time lapse, I probably shoot two the next day,” This shows that he puts a lot of effort into the picture taking and when he can't do one day he will do more later. Which is something I will need to put into my own work.
 |
| Winter Warmth - Matt Molloy |
This s a picture that was taken during the winter but has a warm glow about it, Molloy does this with his pictures and names them things that relate to the picture. It is another time stack done my Molloy. The colours that have been captured are red and orange where the sun is setting.
The time stack was taken using a tripod and a timer. This has been taken over an hour or so, and has been stacked with 100s of pictures.
The artist says that he does at least one time laps a day and experiments with different days, which preserves the day, as you won't get the same effect twice as clouds are forever changing and moving in different directions.
It is a landscape picture, with a lake and trees.The trees are all darkened due to how the blending of the pictures has been set to lighten so all the dark spots are over exaggerated.
The nature of this photography is you never know what you will get, with this picture it is slightly different. As there is normally more movement and more colour in his work, this does have colour but in a slightly different way to the picture below. This picture displays a warm feeling, this may be due to the title or the sun. Added with all the reds and oranges which we relate to as being warm.
This picture is called Red Swoosh, This describes what the picture shows, this is like a lot of his work, and how he names his pictures. The picture has been taken at a sun set where the colours of the dark sky collide with the suns rays bouncing of the clouds. This gives it a warm feel.
This is another time laps of his, which his work primarily consists of.
The trees are darkened as the picture has been blended to lighten. The picture shows that the clouds moving at different speeds with some streaks smoother than others. This is the effect I will be trying to get with my first shoot, but I that wasn't as successful as I thought I would. Molloy plans his out and keeps persevering with shoots as some don't works and that's how photography works.
The time stack was taken using a tripod and a timer. This has been taken over an hour or so, and has been stacked with 100s of pictures.
The artist says that he does at least one time laps a day and experiments with different days, which preserves the day, as you won't get the same effect twice as clouds are forever changing and moving in different directions.
It is a landscape picture, with a lake and trees.The trees are all darkened due to how the blending of the pictures has been set to lighten so all the dark spots are over exaggerated.
The nature of this photography is you never know what you will get, with this picture it is slightly different. As there is normally more movement and more colour in his work, this does have colour but in a slightly different way to the picture below. This picture displays a warm feeling, this may be due to the title or the sun. Added with all the reds and oranges which we relate to as being warm.
 |
| Red Swoosh - Matt Molloy |
This is another time laps of his, which his work primarily consists of.
The trees are darkened as the picture has been blended to lighten. The picture shows that the clouds moving at different speeds with some streaks smoother than others. This is the effect I will be trying to get with my first shoot, but I that wasn't as successful as I thought I would. Molloy plans his out and keeps persevering with shoots as some don't works and that's how photography works.
Saturday, 6 December 2014
Time Stack - How Its done
 |
Then there are many ways to get the layers on top of your background picture.
I just dragged the file from its folder 10 at a time. I did this going in order of when the picture was taken.
|
 |
| Next you need to select all the layers , but not the background. Then change the drop down from normal to lightened. In some cases changing it to saturated in some frames can bring out more colour. |
Third shoot - Contact sheet and best edits
In Preparation to this I had to look up the times for the sun rise and sun set this was at 7:30 and 16:00 retrospectively at this time of year. Further more I required the weather to not be too cloudy with wind to show motion. This enabled me to go to the location at the correct times to get the picture I wanted.
My first attempt at using this was my pictures of the trees, my thoughts behind it was that the motion of the trees in the wind. This didn't work as well due to how the tree moves around in a circle so the motion just makes the tree looks like a blurry tree. So I decided to focus on the sky more, with the clouds. Matt Molloy even says that trees are hard to get right in his picture and tends to avoid them as a main feature in his pictures.
The top 3 rows are pictures from the shoot and the bottom row are the finished edits. I used time stacking in photoshop and blending them to lighten.
This worked with the picture 16. As you can see the stacking has produced a tail that the clouds move along. It was taken with a remote while a lot of the other were not so I had some problems with camera shakes due to the lack of a remote. This was achieved in post-production in photoshop by layering about 30 pictures and blending them to lighten, Another point is that the trees worked in this one more as there was little wind on the ground. The trees are also black due to the blending to lighten, as the trees are dark and get made darker.
 Picture 13 is one of my best edits where I took a time stack of the sun setting. This would have been a better image if there were less clouds but there were some colours that managed to get through and gave the brush like effect of motion. Although I still need to include something other than the sky in my pictures, such as an object or a tree but, trees move in the
 wind,
I feel that I did not manage this shoot as well as I was planing to, I will need to go back and review how Molloy does his work, and will have to choose better days to go out and take pictures.
For my next shoot I will try to develop my composition and attempt to get the colours and the motion on the sky into one shot. This will mean I will have to monitor the weather to get the best day to take the picture. Further more I will use a remote to control the movement of the lens or a timer so I can create a constant stream of pictures.
Subscribe to:
Comments (Atom)


